The Den of Slack

emilymorganti.com

Page 227 of 233

My First Dollhouse

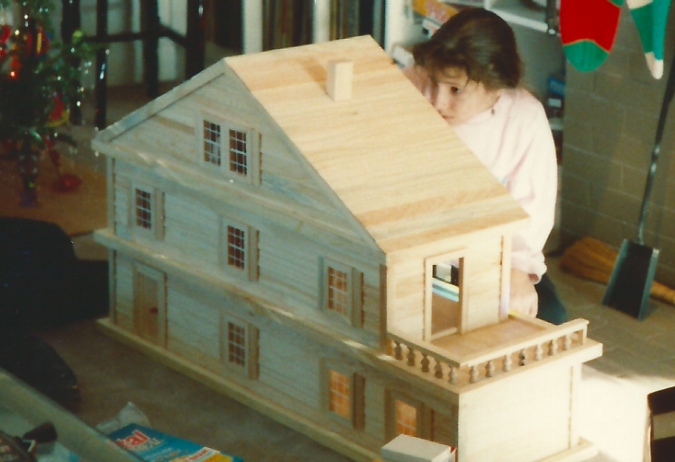
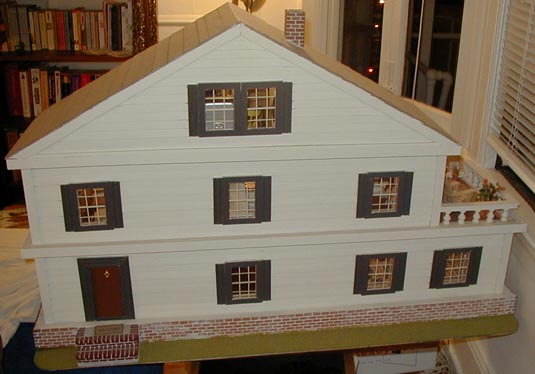
This is actually not my very first dollhouse, but it’s the first one I took seriously. My parents bought it for me for Christmas around 1990, from a local toystore. It’s not quite to scale and was apparently meant to be more sturdy than pretty. This made it a great house to mess around with when I first started looking at miniatures as a hobby, rather than as toys. After I graduated from college I moved it from Boston to California with me… the movers had to build a special box for it!

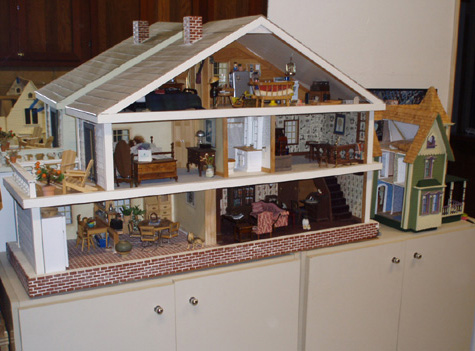
The house has six rooms (seven if you count the kitchen and dining room separately) plus a deck. The floors are very long and the ceilings low, which made it hard to take pictures of some spots.

There’s no real unity in the decor here. I used what I had, and what I could afford to buy. There’s a lot of X-Acto / House of Miniatures furniture (I was first exposed to these kits when my mom found three for a dollar at a thrift store!) A lot of the other things in the house I acquired growing up, which may or may not have been originally intended for a dollhouse.

Continue reading

Fairfield – stairs

One downside to having a house with an “interesting” shape (square and open on two sides, as opposed to rectangular and open on only one) is that it’s hard to visualize the layout. The pictures in the instructions only show certain angles. So, it took me a very long time to figure out where the stairs go, and what parts of them are visible. I decided not to paint until the whole unit was assembled and I had a better idea of what would be showing… and in retrospect I’m glad I did. One of the things that made my Orchid take longer was that I painted every piece individually, when it would have been faster to assemble certain things first, then paint them.

So, I sanded all the stair pieces, then tried following the directions. They wanted me to glue the bottom, top, and one middle riser to one stringer, then glue on the other stringer, then glue on the rest of the risers. I guess this keeps the assembly square, but I just couldn’t get it to work. Instead, I glued all the risers to the left stringer first, let these dry, then glued the other edges of the risers to the right stringer.

Still, putting the stairs together was very frustrating. The risers kept snapping off. In the end, some of the pieces didn’t glue together quite straight. But I decided not to obsess over it… with pieces this small, there’s only so much you can do!

When that assembly was dry, I glued on the treads. Many of these aren’t quite flat because of the crooked risers / stringers. When those were dry, I glued the rest of the pieces together. The angled piece and back side of the staircase will eventually have shelves built on (per the instructions). I love built-in bookcases! I added woodfiller to the stairs to cover up some gaps that resulted from the assembly not being square… didn’t realize that this part of the staircase will be covered up with a wall! As far as I can tell, the only part of the stairs you’ll really see are the stairs themselves (from the top), with both sides enclosed by walls.

Continue reading

Fairfield – foundation & fireplaces

The first difference between the Fairfield and the Orchid: the directions are WAY more comprehensive. The Fairfield’s instructions are organized into about 20 chunks with {gasp} pictures to go along with them. The second difference is that this house is a lot more complicated. It has many, many, many pieces. And it’s a cube with openings on two sides, as opposed to a rectangle with one open side, so the process of putting it together will probably be a bit more complex. Not to mention that the Fairfield, being a 1:24 house, is half the size of the Orchid.

Okay, comparisons aside, I think I’m going into the building of this house with different expectations than I had last time. I expect this to take me a looooong time. And, I don’t expect it to be perfect. I noticed that the picture on the front of the box isn’t even perfect.

The first step was to assemble the foundation.

I started gluing these pieces with white glue, which is what I used on the Orchid. Soon switched to wood glue. Not only is it stronger, but it also dries quicker. The masking tape is holding the pieces in place as they dry.

A few of the pieces were a little tricky to glue (I had to deviate from the instructions on the part of the foundation that goes under the bay windows) but overall it went pretty well. Next I put a coat of sanding sealer on the foundation and the porch area. When that dried, I painted. (The sealer is supposed to make the paint finish smoother… we’ll see!)

Continue reading

« Older posts Newer posts »

© 2024 The Den of Slack

Theme by Anders NorenUp ↑