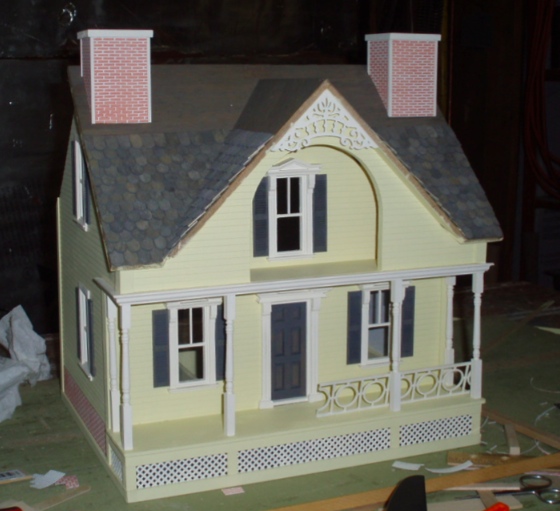
The Den of Slack

emilymorganti.com

Page 121 of 232

Etched windows and the brave little porch light

I have been working bit by bit on the rowhouse bathroom and plan to post a blog about it soon, but jumping ahead a bit, I wanted to show off the “etched” privacy window I made this weekend. The plexiglass in the bathroom window had a small scratch in it that I decided to cover up with translucent scrapbook paper.

I feel like there’s a special name for this paper but I can’t think of it. It’s translucent, with a white design. I got it at Michaels. (It’s on a red book in this photo so you can see the design.) The design is a bit larger than I wanted but this was my only option. I moved the window around on the paper a bit until I found a segment I liked.

Then I cut it out and slipped it in behind the plexiglass. You can still faintly see the scratch (it’s at the top of the flower, just to left of center – more obvious in person than in the photo). But it gets the job done.

Here it is from the inside. Since the window is right over the tub, it makes sense that the bottom would be frosted.

Once I saw this on the house I wished I’d done this with all the windows, but most are glued in already. I thought I could do it with the circular windows that go on the stair wall. I’d considered stained glass for those, but this would be way easier…

And then I thought, why not the front door? It’s always seemed weird to me that the door has two huge windows that you can look right through (isn’t that a security concern, or at least a privacy concern?!) Turns out the same section I used for the bathroom window fit nicely on the door panel.

It took quite a bit of futzing to get these right. (In fact, I burned through all the available flowers and had to go back to Michaels for another few pieces of paper!) There was plenty of space around the edges of the window for me to slip the paper in, but I had to kind of tease it in and any bend or crumble turned into a visible white spot on the paper

Right, so about that missing porch light. Months ago I broke the porch light to the left of the door — the skinny arm that holds the fixture to the base snapped, so that the two pieces were only held together by the wire inside the arm. I fixed it with super glue a few times but each time it came loose again the integrity was worse and finally it snapped off completely. I tried to pull more wire through the hole, hoping I could attach a new light to it, but it wouldn’t budge (not surprising, since there’s wallpaper glued over it).

Continue reading

Cassidy Creations washstand and fire screen

Since half scale furniture can be hard to come by, I’ve been collecting a lot of Cassidy Creations kits, mostly off eBay. I’m planning to build a bunch of them to go in the almost finished Queen Anne Rowhouse, but these first two might end up in other houses.

The first is a washstand that I bought already assembled. I have another of these in the package but the price on this was decent and it looked good in the pictures. Or so I thought. Apparently I didn’t look at the pictures carefully enough (or saw what I wanted to see!) because the washstand was in pretty rough shape — stained a horrid yellow color, coated with polyurethane and rough to the touch, and the metal pieces had all rusted creating black streaks in the wood. Also the door was poorly hinged and wouldn’t stay shut.

I took it apart, removed the metal pieces, and sanded heavily.

Then I painted all the pieces off-white.

I started sanding intending to do a second coat, but liked the distressed look with the yellow stain showing through, so decided to leave it this way. The drawers open, but I glued in the door since it had been damaged by the original pin-hinging. The pulls were leftover from my SDK Miniatures modern kitchen kit — they’re small wooden cylinders that I painted matte black.

I thought I might use this in the Rowhouse attic (above), but later decided it’s a better fit for the puzzle house, which has a pastel, country, almost shabby chic thing going on. I rearranged the bedroom furniture to make room for it near the window.

Still need to add a little towel to the bar, maybe something white with a blue stripe.

Continue reading

The trouble with hinges

The Queen Anne Rowhouse is my first dollhouse with hinged panels, and all along I’ve been fretting about how to handle them. When I got the house it had shiny brass hinges that were very obvious and the screws didn’t all match, which I hated. I bought some antiqued brass hinges to replace them with — same size, but slightly classier.

I’m at the point where the panels need to go back on, and I started with the roof.

Looks great from the top, but underneath the screws stick through.

Geoff helped me sand them down with the belt sander.

Much better! And although I originally planned to leave the underside of the roof stained, I decided to paint it house colored instead, so these little nubs have been covered up completely.

The wall panels have siding so they’re thicker than the roof, and I planned to put basswood trim pieces at the edges to cover up the not-completely-straight edges of the siding, like so. The hinges would then sit on top of these trim pieces, fully visible.

The trim added just enough depth to allow the screw to fit without sticking out the other side.

After gluing on the trim, I used woodfiller to fill in the gaps where it met the siding.

This made for a nice smooth edge.

Then my parents came to visit, and when I showed my dad what I planned to do he suggested setting the hinges on the inner edge so they’d be hidden. I was apprehensive about doing it this way and having it look neat but liked the idea of the hinges being as unobtrusive as possible. So we decided to try it.

Continue reading

« Older posts Newer posts »

© 2024 The Den of Slack

Theme by Anders NorenUp ↑