The Den of Slack

emilymorganti.com

Page 36 of 232

Mr. Spatula part two – fun with resin

Continuing with Mr. Spatula’s water cooler, I planned to make two versions, one with resin water and one with real water like a snow globe. The castle inside the water cooler is a metal charm and I’m concerned it will rust if it sits in water. I spent a very long time looking online for a plastic charm I could use in the snow globe version, thinking “If only I could find a plastic version of the same charm I already have…”

Well, hey! Why not make one out of resin?

I bought a package of Amazing Mold Putty from Michaels. (The price is $23 on the website but it was $26 in the store. Lame.) The way this stuff works is, you take a glob out of the A package and a same-sized glob out of the B package and knead them together until the putty is a uniform color.

Then you squish the thing you want to make the mold of into the putty and let it sit there for about twenty minutes.

I glued pins to the charm, sticking out the bottom, to help secure it to the cork base. I included the pins on the castle I made the mold of, thinking this would allow me to insert pins before I poured in the resin and have them be embedded in the castle.

Looks pretty good! I scraped a razor blade over the top of the mold to make it flat(ish).

Next it was time to mix the resin. I’m using EasyCast. Like the putty, there are two bottles — the resin and the hardener — and you need to mix exactly the same amount of each one together.

Since I’ll also be filling up a dome with resin, I decided to use this process as practice and figured out exactly how much resin I needed to add to the dome to have it stop just above the castle. I poured water into a dome and eyeballed it next to the finished base (I didn’t want to get the base wet) to estimate that 1/2 tablespoon of water or resin would reach just above the top of the castle.

On a paper cup, I drew a line at 3/4 teaspoons (which is half of 1/2 tablespoon) and a second line at 1/2 tablespoon, with the intention of pouring the resin up to the first line and then adding hardener up to the second line.

I set up a light shining at the cup so I’d be able to see the lines from the other side.

The instructions for the resin are to pour equal amounts from both bottles into the same cup and stir for two minutes, then transfer to another cup and stir with a new stir stick for an additional minute. I’m not sure what the reasoning is for pouring into the second cup, but I did it. I set up my phone on the table with the stopwatch running so I could make sure I stirred for the appropriate amount of time.

Turns out this was much too much resin for the mold! However, I noticed that a lot of resin didn’t make it out of the first cup and into the second cup, so what I ended up pouring in was somewhat less than 1/2 tablespoon. This was important to learn, since once it came time to pour resin into the dome I wouldn’t have a second chance to fill it up more — so I knew now that trying to pour in *exactly* the right amount wasn’t going to work.

(Also, I forgot to put the pins in before I poured in the resin. Oops.)

I set it aside for 24 hours, per the instructions. After 24 hours it was still a bit sticky, so I let it sit another 24 hours. The next day it was the same amount of sticky, so I decided to pop it out of the mold anyway.

Continue reading

Mr. Spatula’s water cooler (part 1)

I finished the Sam & Max Freelance Police roombox back in September, but I’ve been holding off on building furniture for it until the action figures from Boss Fight Studio ship — since I’m making most of the furniture from scratch, I want to have them handy as a size reference. Unfortunately the release date has been delayed on these and they’re not expected to ship until the spring.

The most complicated piece I have to build is Mr. Spatula’s water cooler. I’ve been thinking for months about how to do this, and decided to bite the bullet on the aquarium part. I can build the base later when I have the figures.

I’ve never made a dollhouse aquarium before, but they’re usually made with clear resin as water. Normally you pour the resin in through the open top of the aquarium, and can position the fish in the resin as it dries. But since a water cooler is enclosed at the top, I had to figure out another method. I’m going to try two different versions: one with resin water, and one with real water (like a snow globe). This post shows the first steps of the resin version.

I’m using a glass dome with a cork base from Alpha Stamps for the bottle. I would have preferred something with a flat top, and almost used a corked glass bottle instead, but decided against it because the skinny neck would have prevented me from fitting a castle and gravel inside. The big cork on the dome will make a good base.

The castle charm is also from Alpha Stamps. I snipped off the ring and sanded the nubs off with a file. I washed the charm with soap and water, and then painted it with gesso.

I didn’t want to use water-based paint, especially for the snow globe version, so I dug out these model paints leftover from the one and only time I tried to build a model car. (It didn’t go well.) They’re about nineteen years old, so I’m impressed the paint is still good!

Here it is after the first coat. Later I touched up where the black went outside of the lines.

Continue reading

Seaside Villa porch lattice and flooring

I first learned to use plastic needlepoint canvas as 1:24 scale lattice when my Gull Bay came with some. What a brilliant idea! It’s cheap, too — I paid about two dollars for a 12″ x 18″ piece to make lattice for the Seaside Villa, and will have a ton left over.

I painted the section of the foundation to be covered with lattice black, and then cut the canvas on a diagonal. Since the trim on this house is white, I don’t even have to paint it.

I made a frame for the lattice out of 1/4″ x 1/16″ strip wood, painted the same gray as the house. I did this with the house lying on its side and lined the edges of the strip wood up with the bottom of the foundation.

But when I set the house upright, I realized it’s not quite square and the front part of the foundation is slightly lifted off the table.

The glue hadn’t dried yet, so I pulled off the side pieces and replaced them with pieces that were slightly longer. Then I added wood filler to the seams, did a final coat of paint, and cut the lattice to fit inside the hole.

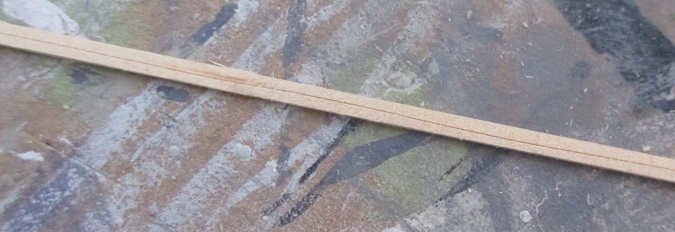
Next I added flooring to the porches. A local hobby shop closed down over the summer (sob) and I bought a bundle of very thin wood pieces in their going out of business sale. Most of the bundle are dark brown, but there were about 15 raw pieces that I pulled out.

These are 3/16″ wide, perfect for 1:24 scale floorboards.

I dyed the end of one with Minwax Classic Gray as a test — it goes well with the gray paint.

Continue reading

« Older posts Newer posts »

© 2024 The Den of Slack

Theme by Anders NorenUp ↑