It turns out my new house has A LOT of fruit trees. For the past five weeks I have been dealing with a huge harvest of plums and peaches. I’ve made 30+ jars of jam! But it’s dying down now, so I can finally start to break in my new workshop.
The new workshop doesn’t have a sink, so I wanted to start with something relatively small and self-contained that wouldn’t require constant access to water. (In other words, something that won’t turn into a big mess that needs to be mopped up!) So I pulled out the attic trunk roombox that I bought off eBay in March.

This roombox was from a Bauder-Pine workshop at the NAME 1987 national convention in Atlanta. It’s rare for me to buy something that’s already finished, but I passed up bidding on one of these years ago and didn’t want to repeat my mistake.

Opening the top of the trunk gives access to lights and the area behind the door and window.

I neglected to take a “before” photo of this view so this picture is from the eBay auction (hence the “Pic 8” label).

The “stones” on the fireplace are painted wood. I know this because I bumped one of them and a bit of wood flaked off. (I was able to glue it back on.)

I like how the mortar spooges out between the stones and between the lath pieces on this side. It’s very attic-like. Beyond the door you can see some ugly wallpaper.

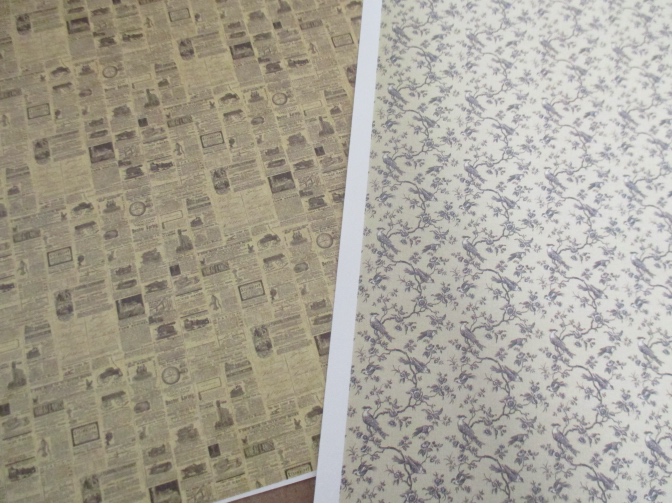
I pulled these out of my stash as possible wallpaper replacements (both are from Itsy Bitsy Mini). The newspaper print might be appropriate inside an attic, but it didn’t seem right for the hallway outside the attic, so I decided to go with the birds.
The room is a separate structure that theoretically lifts out of the trunk, but the wire for the lights runs through both the room and the trunk, which prevents me from pulling the room out without disconnecting the lights. This leaves a very narrow space for dealing with the wallpaper. Also, as you can sort of see in this picture, the floor has a step.

I taped together pieces of paper to make a template.

Then I used the template to cut out the wallpaper. I sprayed this with UV-protection matte sealer before proceeding.

That looks a lot better!

The Itsy Bitsy paper is nice and stiff, and when I did a dry fit it neatly covered up the paper underneath. But when I put wallpaper mucilage on the back of the paper, it softened, and I wasn’t able to push it all the way down to the step. So you can see a bit of the old paper peeking out the bottom. This isn’t that noticeable (it’s behind a door!) but I couldn’t stand to leave it that way.

Baseboard to the rescue! That’s better, but I don’t like how the baseboard stops abruptly at the edge of the step. I’ve never liked that in dollhouse stairs and decided to do something about it this time.

I cut a piece of baseboard with 45-degree angles at each end and sanded down the pointy parts to meet up with the baseboard pieces above and below the step. Then I cut a triangular piece of basswood for the angled piece to sit on top of.

I painted all the pieces with Behr Varnished Ivory.

Here’s the top view.

And here’s the view through the door. You can just barely see this baseboard because of the angle. I would have liked to fill in the gap where the pieces meet with wood filler and paint over the seam, but there’s no way to do that in this narrow space.


 Emily is a freelance writer, miniaturist, and adventure game enthusiast.

