The Den of Slack

emilymorganti.com

Page 55 of 232

Fixing broken things

Almost three years have passed since I packed up 17 dollhouses (yikes), ~20 bins of furniture and supplies, and more kits than I care to count and moved from one 1:1 scale house to another. Even though the move was only 25 miles, getting the houses packed up, transported, and unpacked was a huge effort that I hope never to repeat.

The new house didn’t have a dedicated place to put the dollhouses, so they were scattered all over the house and garage until Geoff built me a workshop in the garage.

The new workshop has proven very good for working in — I have plenty of space for all of my supplies, easy access to tools, and a lot of table and floorspace to spread out on. But it’s turning out not to be great for displaying houses, for a few reasons. The countertop we built for the houses to sit on, with storage behind the houses, isn’t really convenient for setting up furniture. Things get banged into and lost. And don’t even get me started about the rat that was living in the rafters all winter. (Yes, really. Ugh.)

About six months after we moved in, I discovered that the Victorianna’s bathroom floor tiles had changed color. The garage has two west-facing windows and these were shining direct sunlight on the dollhouses for a few hours each afternoon. It didn’t occur to me that this was a problem until too late. (I posted about fixing those tiles here.)

Over time, there have been a lot of problems like that. I’ve become so frustrated with the dollhouses falling into disrepair that we’re rearranging some of our 1:1 furniture (can I get away with making that joke a second time?) so I can move some of the more finished dollhouses out of the garage. While doing that, I’m trying to fix things that have broken and finish small things I never got around to when I was working on the houses. (I have a problem with finishing projects!)

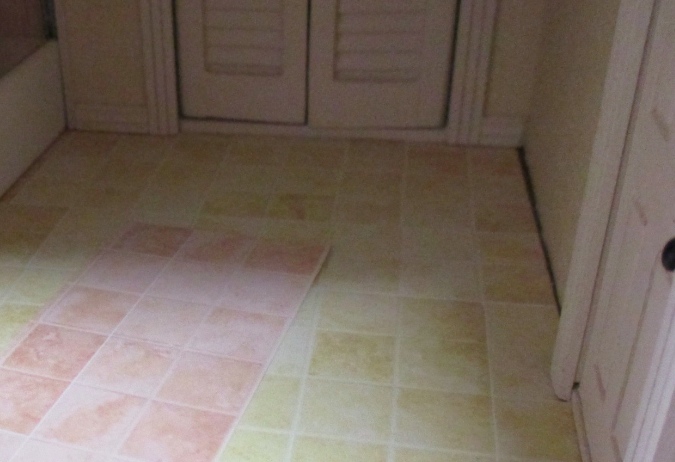
Which brings me to the Rosedale’s tiles. Yep, it happened again.

The Rosedale has two rooms — a bathroom and a laundry room — with floor tiles I printed on an inkjet printer back in 2011. I’m not exactly sure when or how they got messed up. As far as I can remember, they looked totally fine up until the move. I took pictures for my Rosedale gallery about six months after moving, and you can tell in those photos that they’ve started to change, but they still looked a lot better then than they do today.

The Victorianna is open on the sides, which put the bathroom in the path of the sunlight coming through the window, but the Rosedale’s open back has mostly been facing away from those windows. So… who knows what the real culprit is? A mix of sunlight and moisture? The garage isn’t climate controlled, but it isn’t particularly damp either.

While searching through my stash for tiles to replace these with, it occurred to me that I probably still had the original files. (My computers are like my workshop — nothing gets thrown away!) Because these are such simple rooms and I’ll soon be moving the Rosedale into my climate controlled dining room, I decided to take the risk of using the same printed tiles again.

Here’s how the faded bathroom tile looks next to a new printout of the same tile. Wow.

Continue reading

Blackbird Bar – almost finished

I’ve put off posting about the bar roombox while I finish up some small details that didn’t seem exciting enough to post about on their own. Back in March I added brick to the outside of the roombox, using Magic Brick like I did on the front. I thought it would be easier to do all three walls at once than to try to match up the pattern at the corners, so I started by wrapping the sticky templates all the way around the roombox. I protected the junction box with masking tape.

The bricks on the front part of the roombox came out disappointingly flat, so I made a point of spreading on the brick material very thick this time.

You’re supposed to pull off the template no more than five minutes after spreading it on. With this much area to cover, that wasn’t going to happen!

It worked out okay, though. I took this picture while the bricks were still wet. Some are a little messy and on the right you can see a spot where I accidentally stuck my finger into the bricks and smeared red color into the grout line, but overall I’m much happier with these bricks than the first attempt.

Here’s a comparison – the new bricks on the left and the first ones on the right. See how some of the original bricks don’t even have texture, just color? I think I just didn’t use enough of the brick material, plus it was too watery, so the texture that did stick ended up flaking off after the bricks dried. That’s happened a little bit on the new batch, but overall they’re much more brick-like. Even so, I don’t think I’ll use this stuff again. It’s a cool concept but I think egg carton bricks look more realistic.

Next I added a logo to the door. I came up with the name Blackbird Bar early in the project because I knew black was going to be a prominent color in the decor, and it just sounded cool. I have some glossy sticker paper left over from my mini Absolut bottles and life sized spice jars, so I decided to print something to go on the front window of the bar.

Initially I was thinking of a simple blackbird in silhouette, but when I started Googling I discovered several real life bars named Blackbird. This is the logo for a bar in Milwaukee.

Continue reading

Half scale Dutch door

Both of my Bill Lankford cottages came with plastic Grandt Line doors installed. I want these to be old country cottages and the those doors seemed too modern, so I removed them intending to make my own rustic doors. Browsing Etsy recently I came across these plank doors from Bauder Pine, and $1.99 is an excellent price, so I decided to give them a try.

These doors fit into an opening that’s slightly taller than the Grandt Line doors, so I had to do some sanding to make them fit. I used the disc sander to reduce the base of the door and also enlarged the top of the door hole with a utility knife and a metal file.

I wasn’t able to match the stain exactly, but came close with a coat of Minwax Weathered Oak followed by a coat of Aged Oak gel stain. It’s pretty shadowy under the overhang of the thatch roof. I’m thinking of ordering another wreath from 4hala to brighten it up but will wait until I fix up the landscaping, so I know exactly what I want. (You can see the wreaths I previously ordered from that shop here.)

The Thatched Cottage has a second door on the back, and I thought it would be fun to make that one a Dutch door. The pins in these doors were too tight to pull out (I tried on three different doors!) so I had to take apart the frame in order to remove the door. This was pretty easy just by wiggling the joints until they snapped apart.

I used my saw and miter box to cut the door in half.

My idea was to add a pin hinge in the middle, so the top and bottom pieces were hinged to each other.

The frame was still disassembled, but it seemed like pin hinging was going to work.

Continue reading

« Older posts Newer posts »

© 2024 The Den of Slack

Theme by Anders NorenUp ↑